(You can read all posts about the Rear Window Dress.)

First things first. I needed to take stock of what I had and what I needed. I thought it might be best to take the dress apart first, to make sure that I could use the pieces and put them back together again without too much damage to the already-torn netting. But how far did I need to take it apart? I wouldn’t be sure until I had settled on an overall design. Then again, how could I settle on an overall design until I had taken it apart? I seemed to be at an impasse.

I turned the garment inside-out and examined the construction again. Hmm. This thing was going to need to come apart in layers. But I was satisfied that it could be done and that once done, the existing skirt could easily be attached to a new bodice. Just about any bodice, really, so I decided to start there.
I knew I didn’t want to simply create a facsimile of the original Rear Window Dress. Instead, I wanted to create a tribute to the original, in a way that made use of as much of the existing skirt beading as possible. But the black, deep-V bodice of the original was a must, so I quickly decided a new bodice would have to be made from scratch. To that end, I immediately began a search for just the right pattern.
Voilá! There was Vintage Vogue 1172. It had the perfect look, the perfect lines, and a side seam zipper on the left. Even better, I already had it in my pattern library.
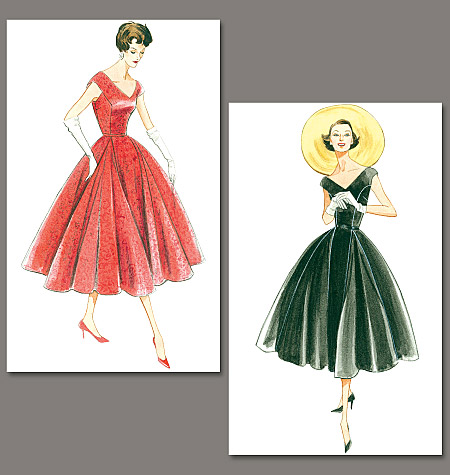
The closure location was important in deciding to use this pattern, since the existing dress also had a left zipper closure that needed to come out in order to detach the skirt from the bodice. All of the skirt layers seemed to be sewn together in this spot for stability, so I was doubtful that I could either successfully remove the seams without ripping the tulle netting or sew the seam closed and still have it lay as flat as the opposite side. I was confident now that I could leave the layers as-is and use the existing seam allowance to put in a new zipper. Then I wouldn’t have to worry about adapting the skirt for a back seam or rethinking major construction details. Easy.
Having settled on a pattern, I started forming a picture in my mind of the possibilities. It was time for putting them on paper. I grabbed my clipboard, some paper, and a brush pen and sketched it out quickly using the pattern envelope artwork as a template.

Yep. That is what I wanted. Now that I had silenced the cacophony of ideas swirling in my head by committing my vision to paper, I needed fabric. I’m not at all sure what type of fabric was used for the original movie dress bodice. It could have been a stretch knit or a woven satin, for all I knew or cared. But I had already made up my mind what kind of texture I wanted for my bodice: velvet.
But black velvet was not to be found in my stash, beyond a few thin scraps from an embossing project I had done years ago. (Would anyone be interested in a post about how to custom emboss velvet using normal household items?) A trip to the fabric store was in order (like I need an excuse!), but it could wait until tomorrow. (It was rather late at night, as I remember, so a trip at the moment was out of the question.) Best to instead get started on deconstruction in earnest.
I snipped off the rose embellishments and set them aside, hoping to use them again in the final product on a detachable belt. I reached for a seam ripper and my best pair of eyeglasses. Then I settled myself on my bed next to a reading lamp, turned on some music, and began to pick loose the stitches from the bodice lining.

Leave a Reply